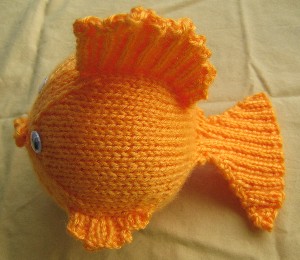
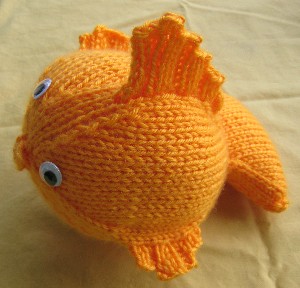
How to make your own Goldfish!
These goldfish are fun and easy to make. As pictured here, they are about the size of a grapefruit.
The complete pattern with notes and
photos is below, just keep scrolling. If you just want the pattern with
the how-to pictures,
here is a PDF version for you.
September 13, 2011: Maepatel on Ralvery, made a great fish and spelled out two errors in the pattern. I had known there were some but just had not gotten around to sussing them out. She not only identified the errors but she clearly, and perfectly wrote out what should be there so all I had to do was copy and paste! Thank you, Maepatel!! Pattern now fixed (PDF, too!)
December 22, 2008: I got an email this morning from Melissa Starkweather who said she had found my pattern via Knitting Pattern Central. She sent photos of her fish and she has some amazing variations! I can't wait to try some of them myself. I asked her for some details and she provided them plus other pictures. Thanks so much, Melissa! You totally made my day!

Melissa's fish presented with the help of the lovely Fyn. Melissa and Fyn
divide their time between North Carolina and Michigan and she knit these
beauties for her grandson, grand nieces and nephew.
(click to see a bigger version for detail)
More pictures and details below.
While I've been knitting for more than 50 years, this
is the first time I have ever created a pattern. Rather than make
it a traditional knitting pattern, I tried to create it as though I was
showing you how to do it the way I do. A few items to note:
The fish are made starting from the bottom of the back fin and knit, in one piece to their their little puckered fishlips. The top and side fins are knitted in after the body is stuffed and finished. There are two versions. One has a stuffed tail fin which balances it better. The other has a ribbed tail fin which looks better. They start off differently but end up the same. Here's what I used to make the fish in the pictures:
Most all of the pictures are linked to bigger way more detailed versions. |
| Ribbed Tail Fin version
|
|
| Cast on 40 stitches. Work 2 rows of K2,P2 ribbing. On the next row and all other rows: Delete 1 stitch at the beginning and end of each row. Until there are 10 stitches. |
 |
| Knit one row even. Continue the round by picking up 10 stitches on the back side of the work. See photo at right. You are establishing a round of 20 stitches. Place a marker in between stitches 5 and 6 on each side of the round. Knit one round evenly. |
 |
| K1, increase 1, knit to within 1 stitch of the
marker, increase 1, K1, move marker, K1, increase 1, knit to within 1
stitch of the marker, increase 1, K1. Repeat for the second half
of the round. Work one round even. Repeat these two rows until there are 19 stitches on either side of the marker on each needle (76 stitches total). Work round after round on those same 76 stitches until you have 1.5" since the last increase row.
|
 |
|
Stuffed Tail Fin version
|
|
| Crochet a chain of at least 25 chains. Load 24 stitches onto the needle. |
 |
| Load 24 stitches from the other side of the chain onto the needle so you will have a round of 48 stitches. |  |
| Knit two rounds even. |  |
| K1, SSK*, knit until the last three stitches.
K2 together, K 1. Repeat for second half of the round. Knit 1 round even. Repeat these two rows until you have 10 stitches on each side of the round. *SSK=Slip one stitch, then slip the next. Insert left needle into the front loops of the slipped stitches and knit them together from this position (through the back loops). |
 |
| Stuff lightly. |  |
| I like to 'seal' the stuffing in at this point by
picking up 3 evenly space stitches across the stuffing. (See
photo.) This could also be easily accomplished by basting the two
sides together with sewing. Place a marker in between stitch 5 and 6 on each side of the round. Knit one round evenly. |
 |
| K1, increase 1, knit to within 1 stitch of the
marker, increase 1, K1, move marker, K1, increase 1, knit to within 1
stitch of the marker, increase 1, K1 Work one round even. See? It's the same now as the Ribbed Fin Tail version. Repeat these two rows until there are 19 stitches on either side of the marker on each needle (76 stitches total). |
 |
| The Rest of the Fish | |
| Once you get to 76 stitches (pictured here), just
knit the rounds evenly without increasing or decreasing for 1.5". Work round after round on those same 76 stitches until you have 1.5" since the last increase row.
|
 |
| After 1.5" start decreasing. K1, SSK*, knit until three stitches before the marker, K2 together, K 1, move marker, K 1, SSK, knit until three stitches before the end, K2 together, K1. Repeat for second half of the round. Knit 1 round even. Continue until there are 18 stitches on each needle or side of the round. |
 |
| At this point you want to add the eyes and stuff. I use a little piece of muslin on the inside to anchor the eyes and keep them in place. You can see this in the picture if you look at the fish on the right. |  |
| After eyes are on and the fish are stuff, continue
your decreases until there are 10 stitches on each needle or half round. K1, SSK*, K2tog, SSK, K2tog, K1 Next round, K2tog, K2tog, pass the result of the first K2tog over the second, continue until all stitches are bound off. Cut yarn and thread the tail through a needle and tie off the lips squishing them up so they look fish lippy. |
 |
| I have two different top fins that I use depending on
my mood. They both start the same way. Starting at the point
on the top of the fish about where the decreases start, pick up 18 - 24
stitches. (I start at the front and pick up one stitch for each row of
the 1.5" and then a couple on either side. For the tall fin, I knit 2 stitches into each and then start K2, P2 ribbing. For the shorter fin, I skip the doubling. |
 |
| At the tail end, bind of 3 stitches, finish row.
Next row even. Bind off 3 more stitches, next row even. The number of stitches you bind off can and should vary to ensure your fish's personality. Side fins work the same way. I pick up 12 stitches on the side. 1 row K2, P2. Next 2 rows, bind off 3 to start. Following row, bind off the rest of your stitches. |
 |
| There are lots of ways to do this differently and you
should experiment with all of them. I would ask that if you find
an error in this pattern and/or have a way I can make it more clear,
please drop me a note at
susandennis@gmail.com.
You can also find all of these pictures on Flickr. I have some other knitting stuff on my knitting pages and I am susandennis on Raverlry. Enjoy. *SSK=Slip one stitch, then slip the next. Insert left needle into the front loops of the slipped stitches and knit them together from this position (through the back loops). |
Melissa got very creative with both the fins and with the eyes. I love them both! She notes that the eyes were inspired by wanting a safer alternative. I applaud this effort but have been too lazy to do it myself. However.... she has inspired me.

She says they are crochet circles with french knot pupils. They are just wonderful. PLUS, you could add them when you are finished as opposed to how I do it now. That would be a plus. Oh and look at all her different fish mouths!!
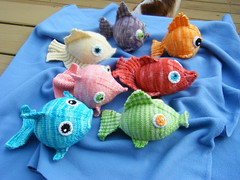
Here's another view. I just love these guys and I also love her blue 'sea'. Oh and one more thing.... she dyed the yarn! It's Bare DK from Knit Picks, which she dyed using Kool-Aid.